TypingDNA Verify 2FA integrates with Ping Identity using OIDC, allowing it to function seamlessly as a two-factor authentication method. This setup requires the use of PingOne DaVinci flows which can be further employed as policies in both PingOne (for Workforce or Customers), and PingFederate.
First, let's differentiate between the main Ping Identity products / authentication authorities:
1. PingOne SSO (or simply PingOne): is the main Ping cloud-based solution, similar to Okta, or Microsoft Entra, which is now used for both workforce and customer facing apps. This is typically where your identities will be stored and managed.
2. PingFederate (or simply PingFed): is the legacy on-prem solution specifically designed for the workforce. Much like PingOne but on-prem and somehow deprecated in favor of PingOne.
Note that there is also PingOne Advanced Identity Cloud (formerly ForgeRock Identity Cloud) and Ping AM (formerly ForgeRock on prem) - but we will not talk about any of these in this article. TypingDNA does work with these in a slightly different way. Feel free to contact us to learn more about it.
Secondly, there are 3 ways to do MFA:
1. PingOne MFA: is the customer focused minimal MFA capability built in PingOne, typically bypassed in favor of the more powerful PingOne DaVinci.
2. PingID: is the workforce focused cloud-based MFA solution originally designed for PingFederate. PingID is very similar to PingOne MFA but it is a bit more robust allowing for more options/factors. PingID is often dropped in favor of PingOne DaVinci as well. However, many DaVinci flows can and typically use PingID authentication methods throughout the user journeys.
3. PingOne DaVinci: is the ultimate “identity orchestrator” which allows for complex applications (called flows) to be employed in PingOne and PingFederate, as authentication policies. These allow for risk based, application based, user based and device based approaches to MFA, risk authentication and other user journeys, and comes with the ability to make use of various 3rd party methods (such as TypingDNA Verify 2FA). For example, you can work with PingOne identities and delegate PingID for MFA, while constantly evaluating risk and enabling more complex decisions based on roles, devices, applications, user behavior, etc.
Tutorial: TypingDNA + DaVinci + PingOne
Let's build a TypingDNA integration with PingOne DaVinci and PingOne SSO
Prerequisites
Ping Identity account with the following services:
PingOne SSO
PingOne DaVinci
TypingDNA dev/client account, upgraded to Enterprise
On TypingDNA dev/client side:
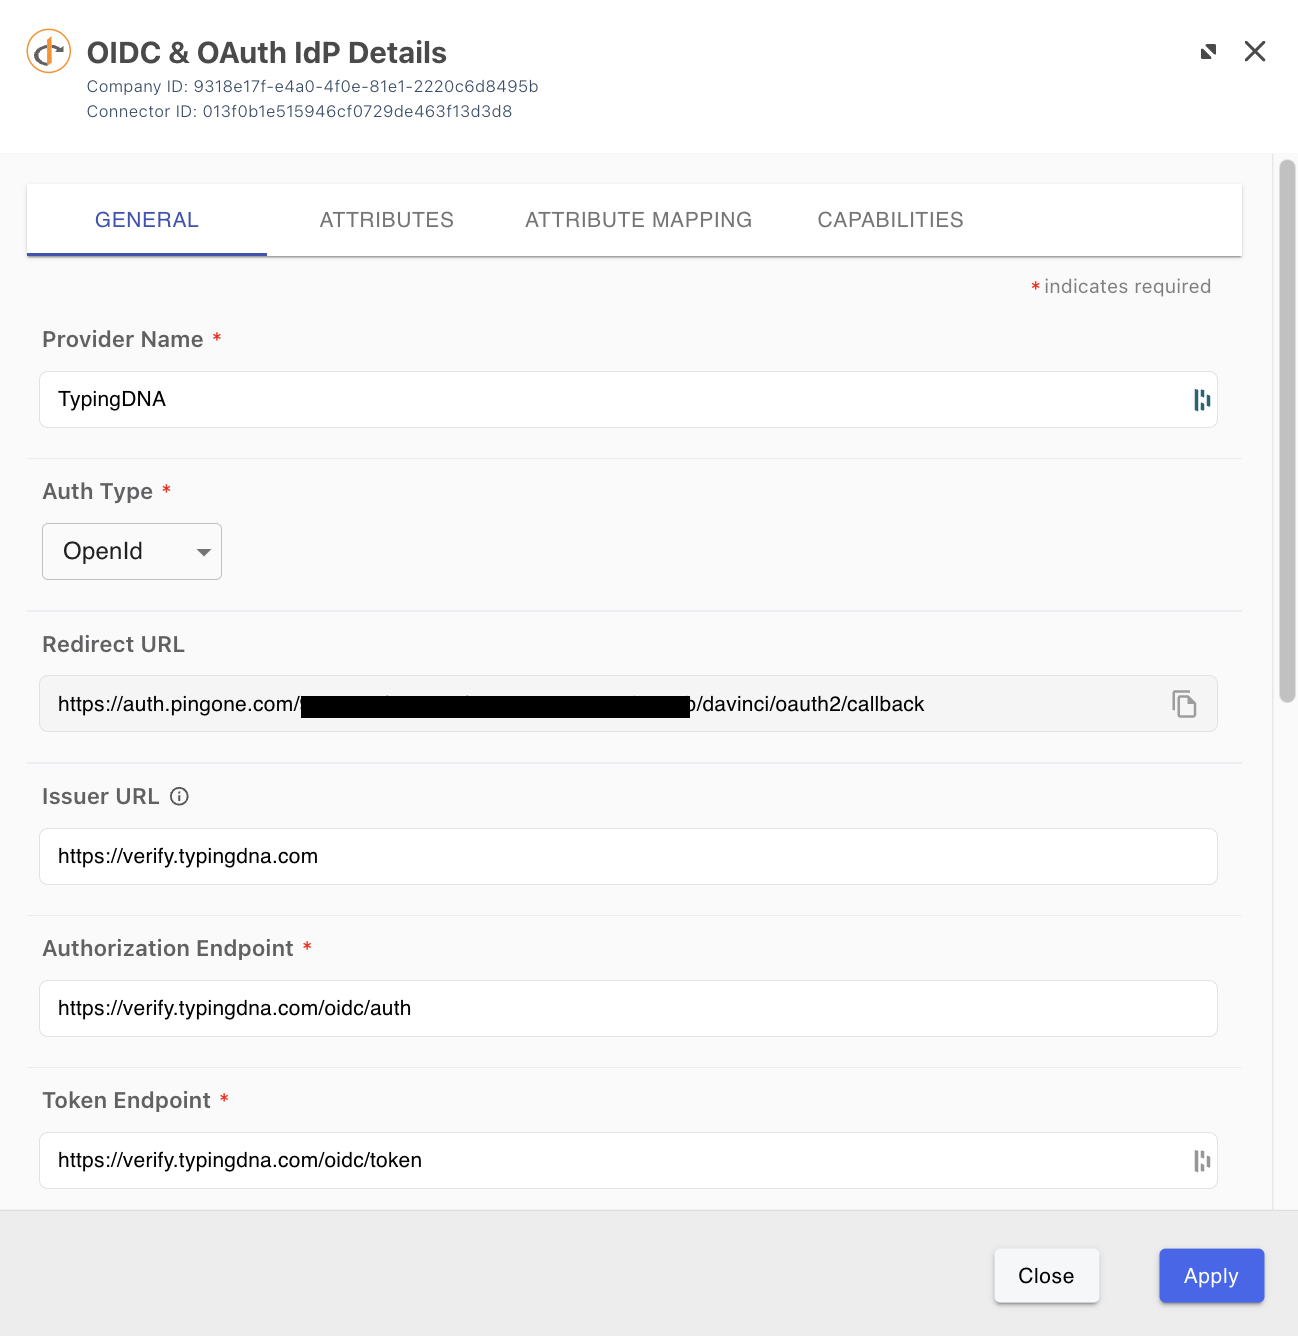
Add a new OIDC integration from the TypingDNA side
Note: An upgrade to Enterprise level is required to utilize OIDC integration.
Ensure the Verify 2FA tab is active.
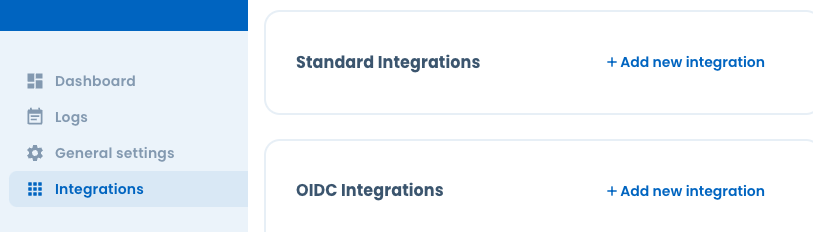
Select Integrations from the left side Menu. In the OIDC integrations panel click Add new integration.
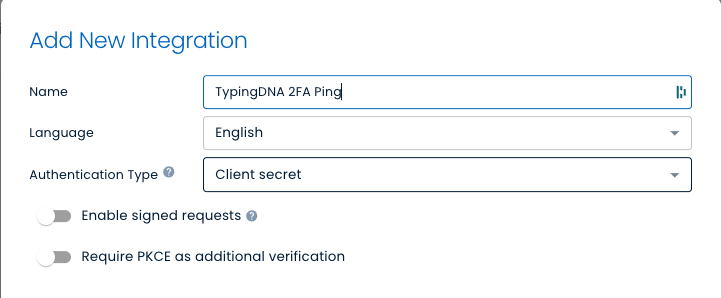
Name your integration and click the Create button.
Note that Ping only supports the “Client secret” authentication type. Also, leave the other settings default for now as not all OIDC options available from TypingDNA are supported by Ping.
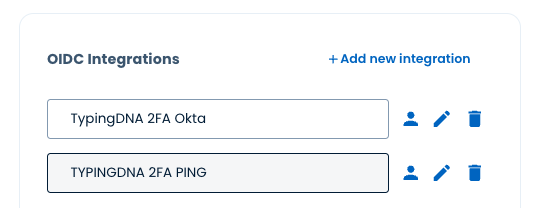
Now, you should be able to view your integration in the OIDC integrations panel.
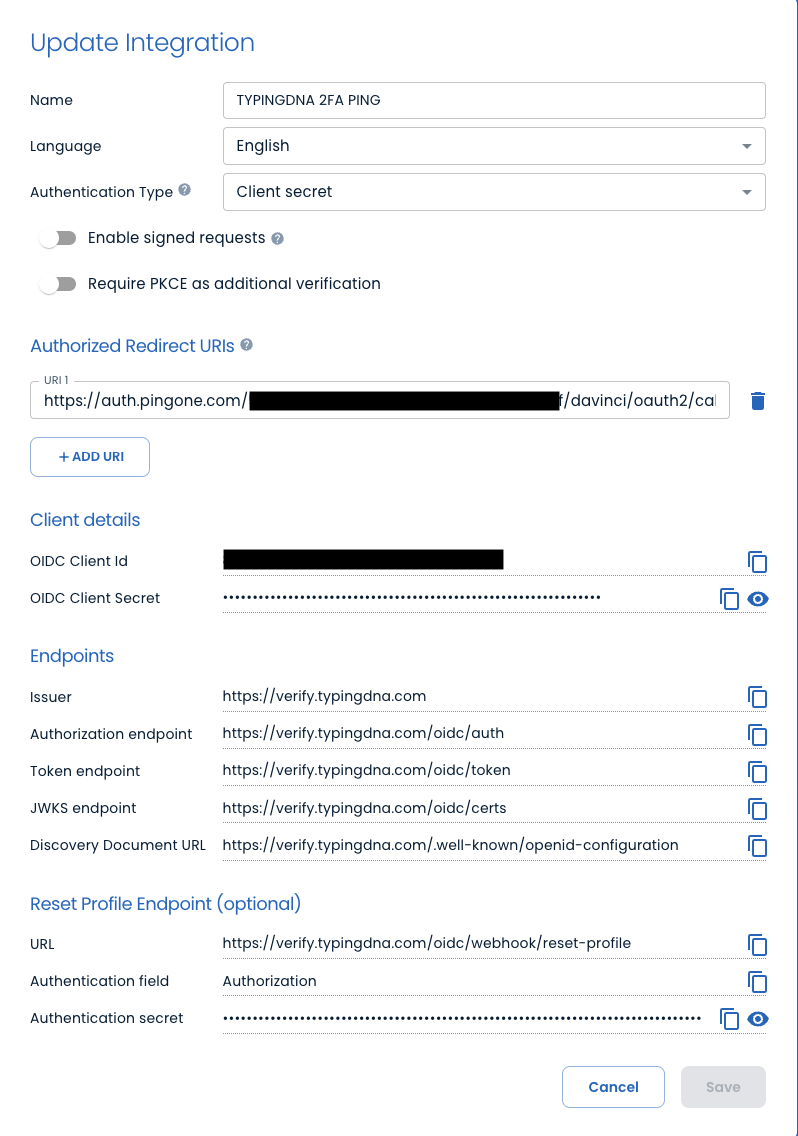
You will be able to edit your Authorized Redirect URI (adding the one obtained from Ping, explained below) as well as see your OIDC credentials, and endpoints (needed on the Ping side, in the next chapter).
2. Import the TypingDNA Subflow in DaVinci
The next thing is to configure a DaVinci flow that uses TypingDNA as well as your PingOne identities and add this flow to a demo app. We're going to use the default environment's Application Portal to test.
From the PingOne Console menu click DaVinci, which will take you to the DaVinci orchestrator.
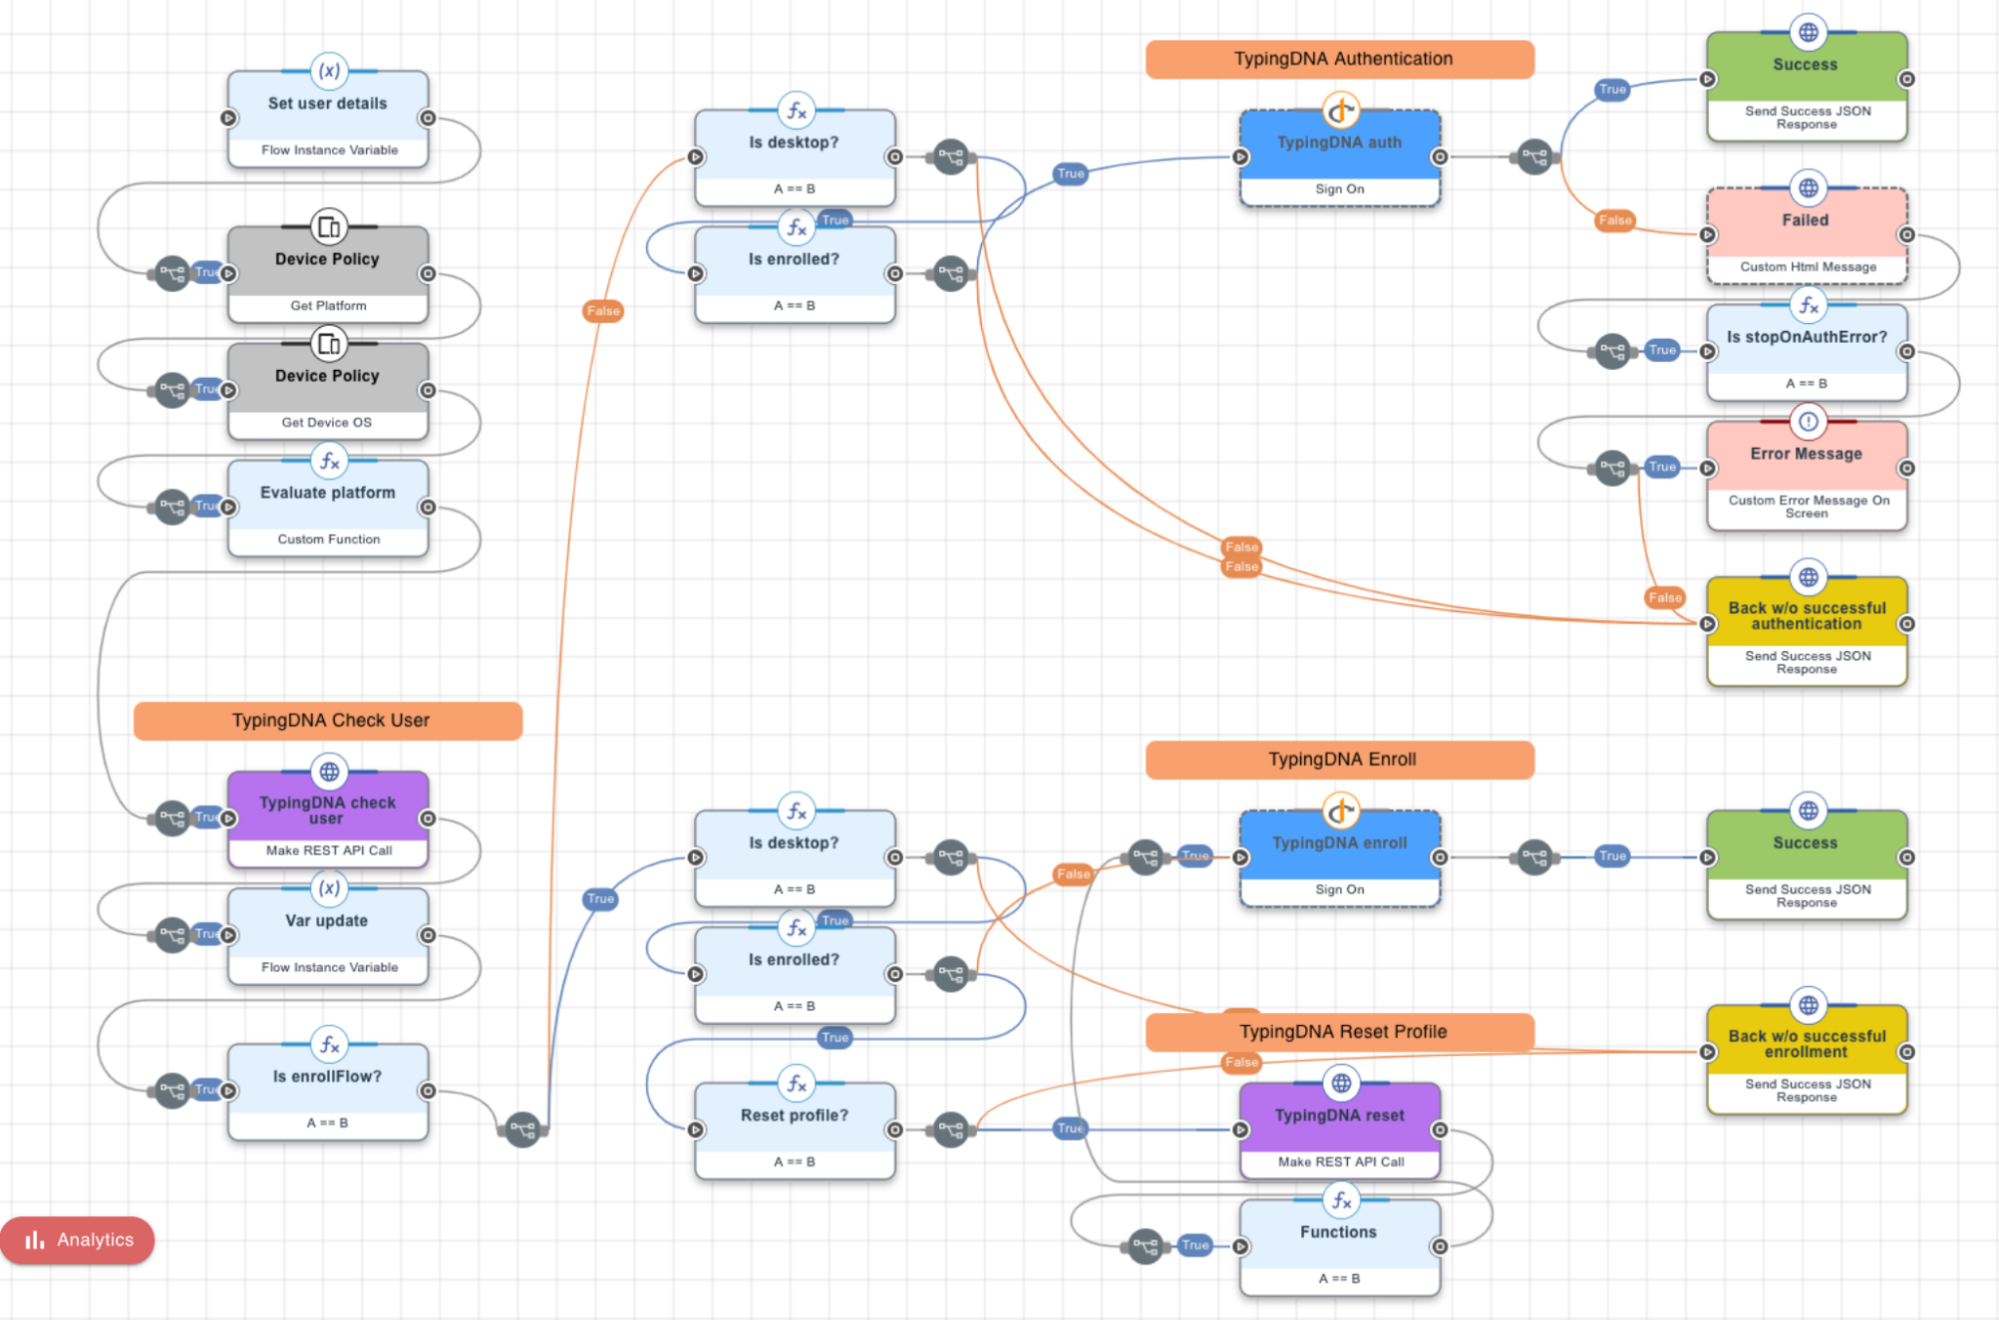
In order for TypingDNA to be employed we created a Subflow that needs to be imported from the Ping Identity Marketplace. At the end of this tutorial we explain in more detail what this Subflow does, so you can make changes to it, if you need to.
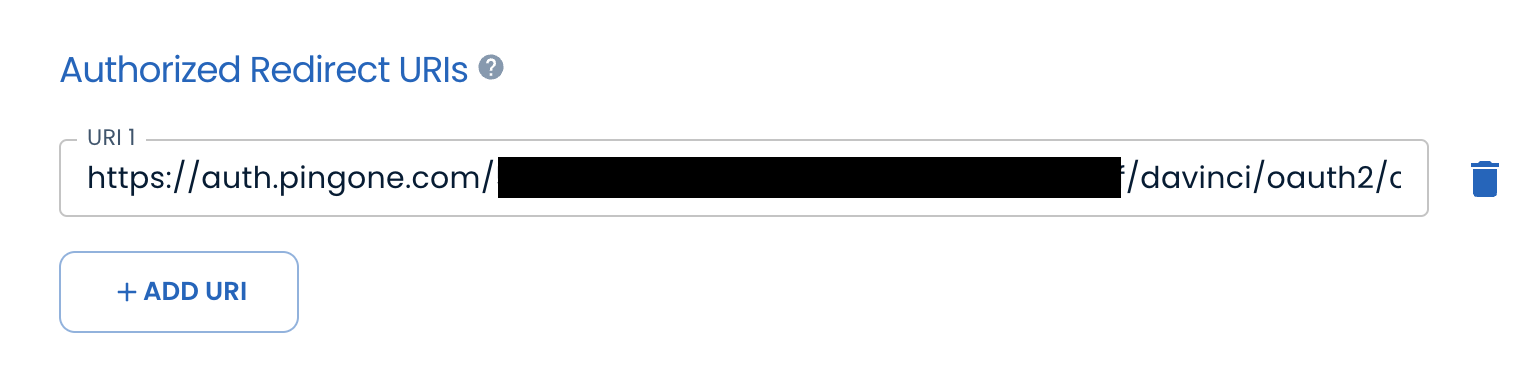
The connector named "TypingDNA auth" here is a TypingDNA connector. Right-click on it and select Edit connector
Note that you will need some data from the TypingDNA's Verify 2FA OIDC integration that we've set up at the first step.
Complete with the following information:
Client ID: COMPLETE WITH CLIENT ID (from TypingDNA)
Client Secret: COMPLETE WITH CLIENT SECRET (from TypingDNA)
Redirect URL: note that this is a read only attribute, COPY this value and PASTE it in the Authorized Redirect URIs in TypingDNA's Verify 2FA OIDC integration.
Note that now, the 2nd blue connector (TypingDNA enroll) has also been automatically configured with the same information. This is because these 2 connectors are in fact the same one, they are just doing different things (one does authentication and the other does enrollment)
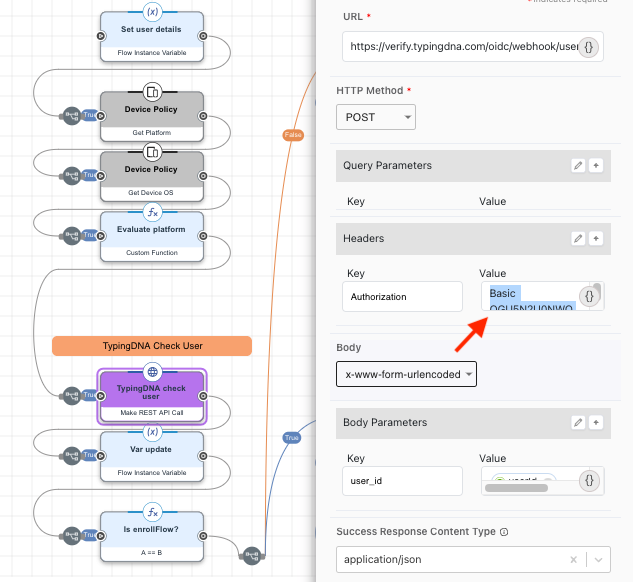
4. Configure TypingDNA check user connector (purple, HTTP)
The purple connector named "TypingDNA check user" here is an HTTP connector.
This connector is used to check if a user has a TypingDNA profile enrolled.
Note that, if desired, this information can be designed to be stored redundantly in your PingOne or PingFed. The check user sequence can be used in other flows where you want to check a particular user's TypingDNA profile.
This connector doesn't have to be edited, but just simply click on it and change the Authorization Value with your Authentication Secret value (from the Reset Profile Endpoint section in TypingDNA's Verify 2FA OIDC integration that we've set up at the first step). Then click Apply.
The connector named "TypingDNA reset" here is an HTTP connector.
This connector is used for when a user's TypingDNA profile needs to be reset while an enroll flow is being performed. This is an optional sequence of the subflow that only works if enrollFlow=true, and resetProfileIfEnrolled=true.
However the sequence can be used in other flows where you want to reset a particular user's TypingDNA profile.
This connector is configured exactly like the other purple connector, simply click on it and change the Authorization Value with your Authentication Secret value (from the Reset Profile Endpoint section in TypingDNA's Verify 2FA OIDC integration that we've set up at the first step). Then click Apply.
Congratulations! Now, you're ready to add the TypingDNA Subflow to an existing flow.
6. Add the TypingDNA Subflows inside DaVinci flows
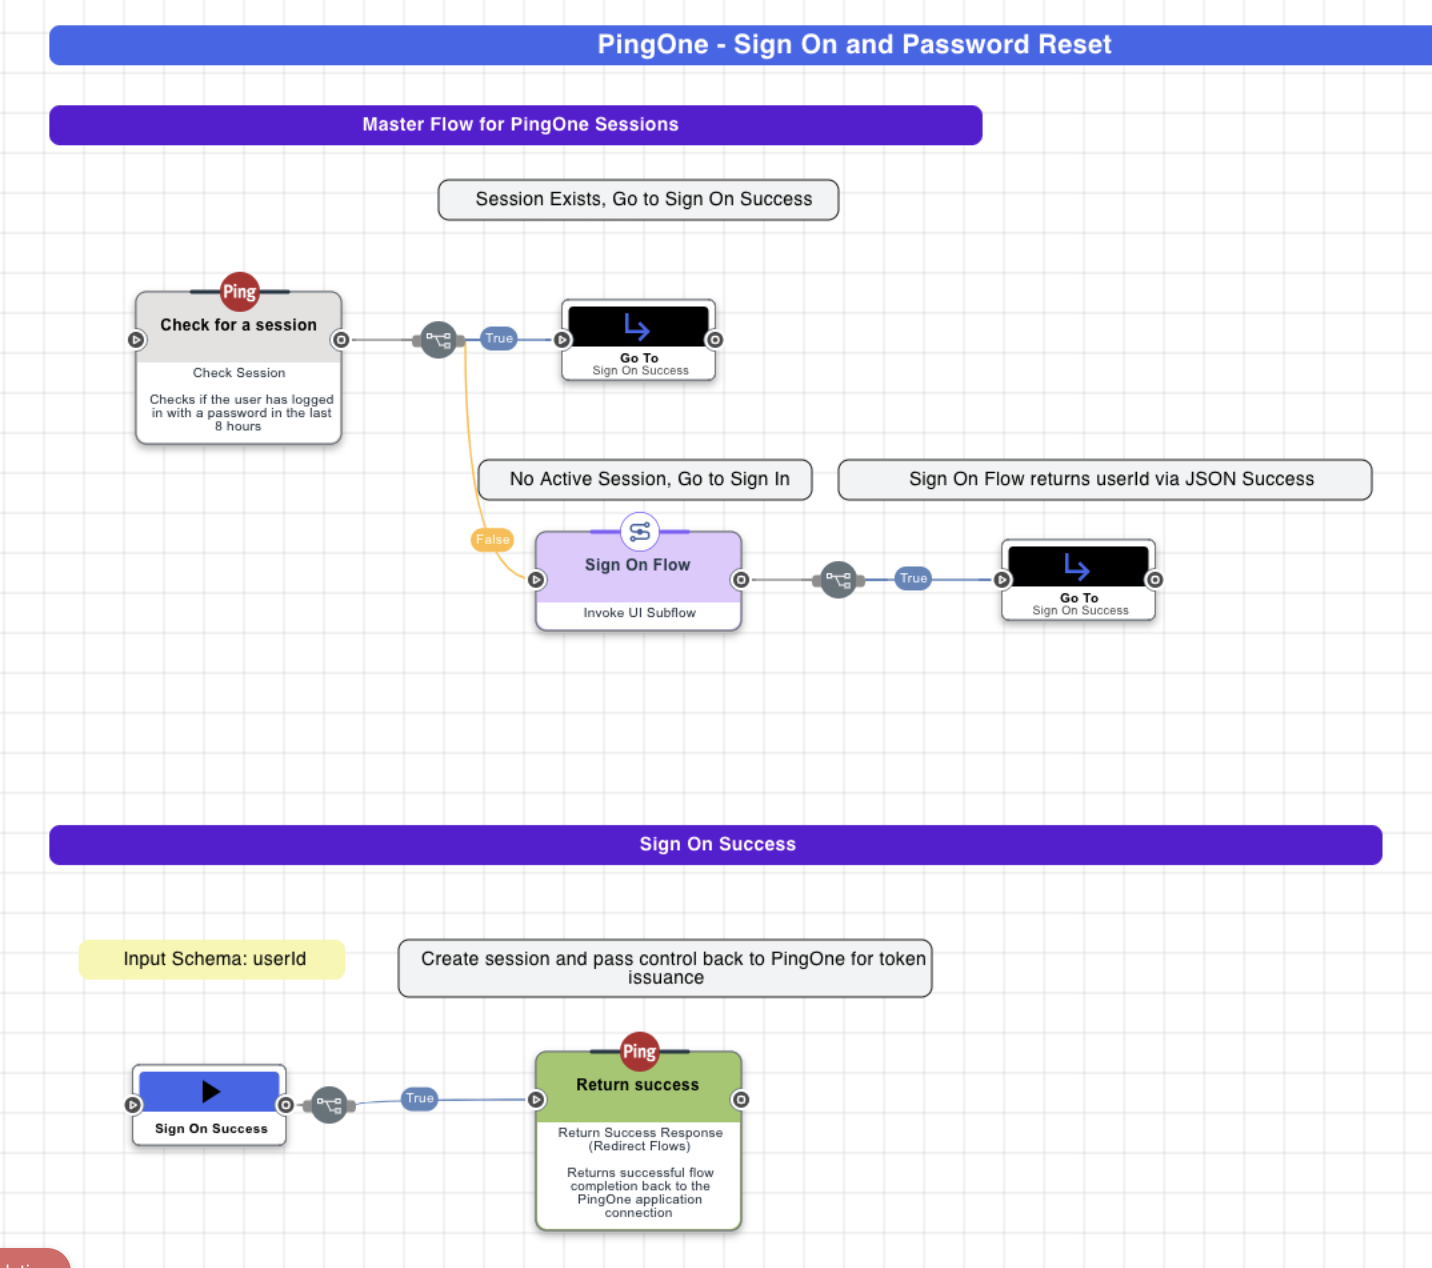
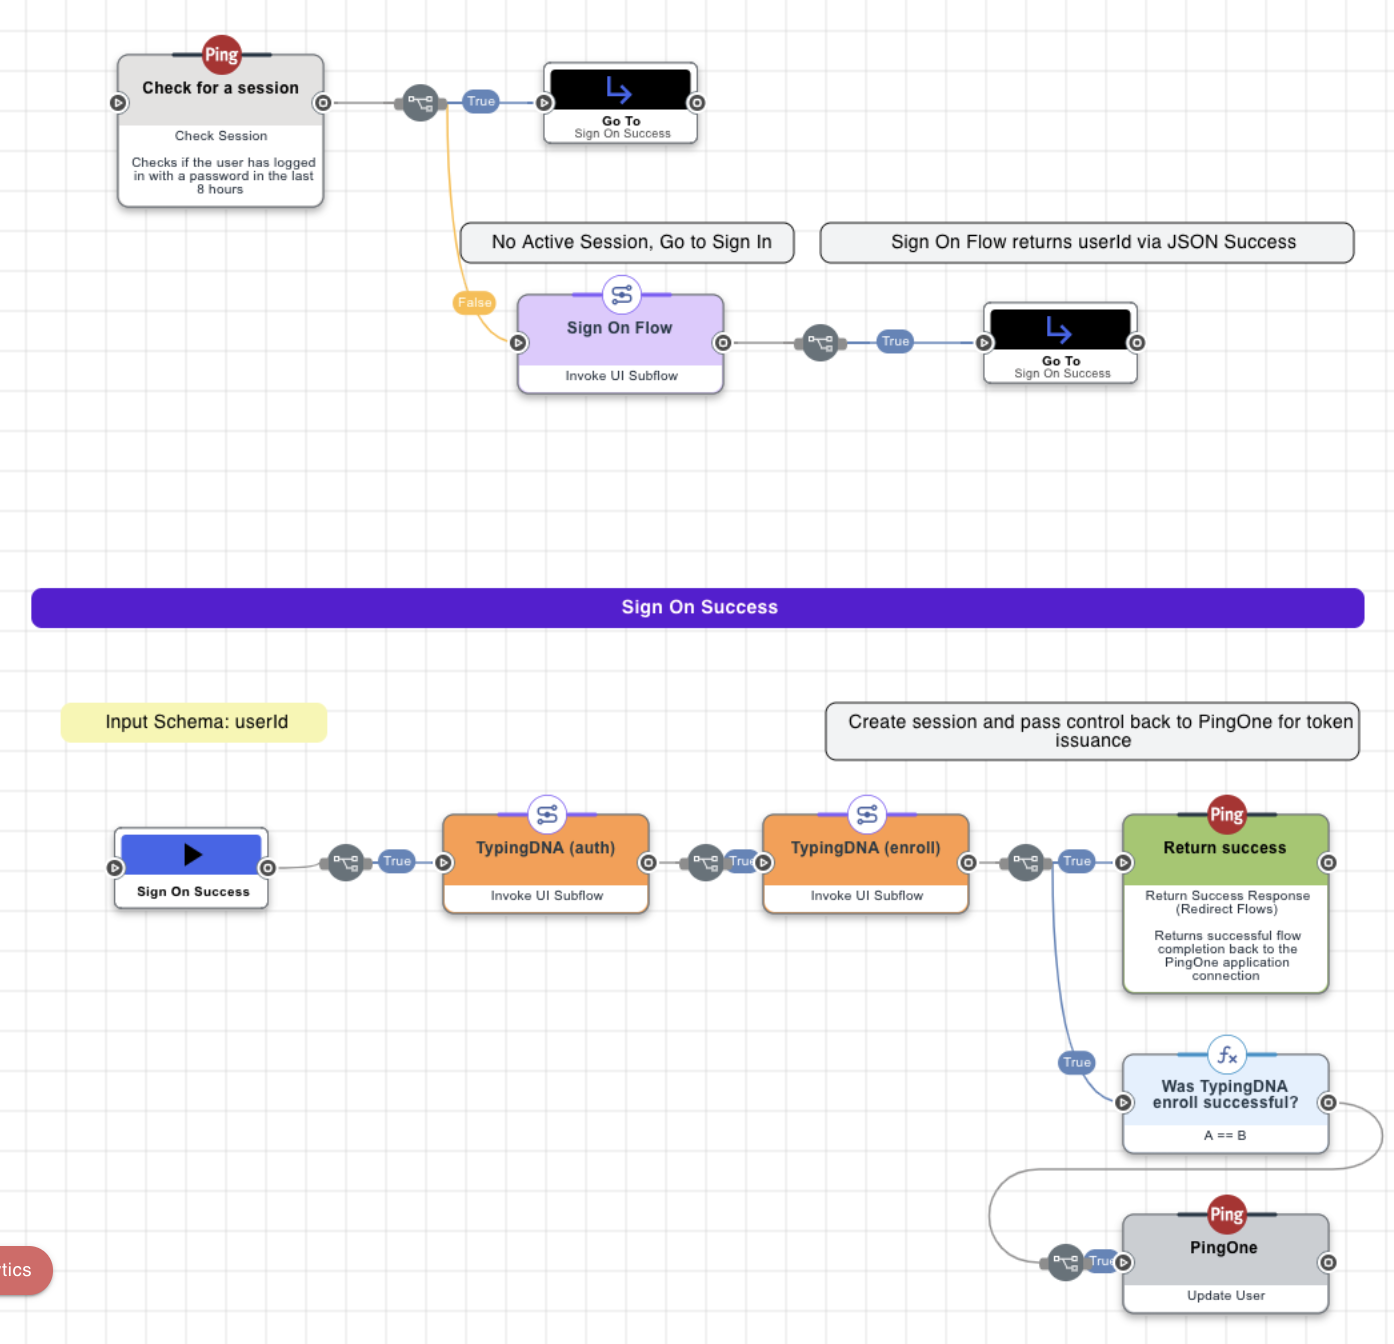
Let's start with a basic DaVinci flow called “PingOne Session Main Flow”. This flow uses PingOne identities and handles sessions, sign on and password reset. No 2FA whatsoever.
We're going to add the TypingDNA subflow for A. Authentication, and also for B. Enrollment, right after success, as seen in the image below. That means if a user has already been enrolled with TypingDNA they should be able to authenticate with it right after logging in with a password. And if they were not yet enrolled, they will be prompted to enroll only this time.
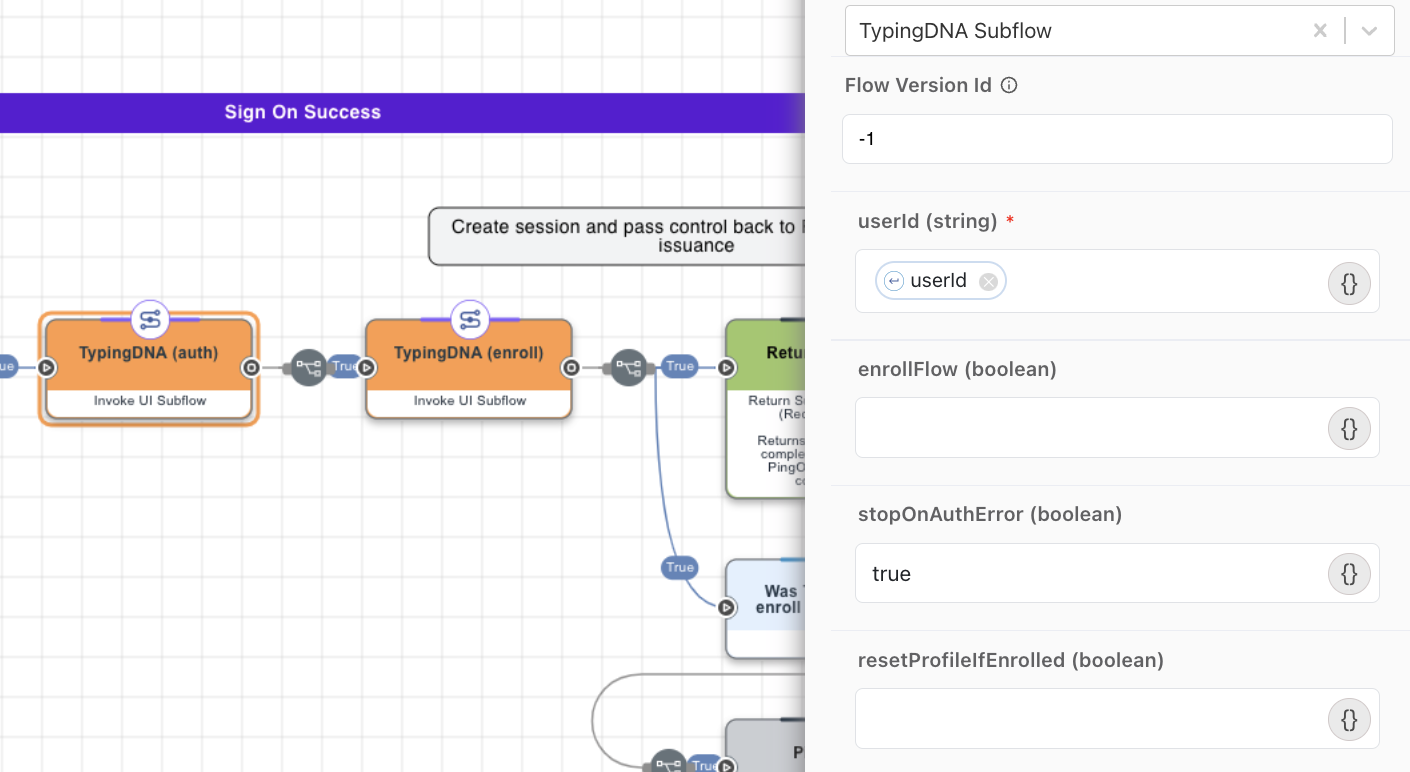
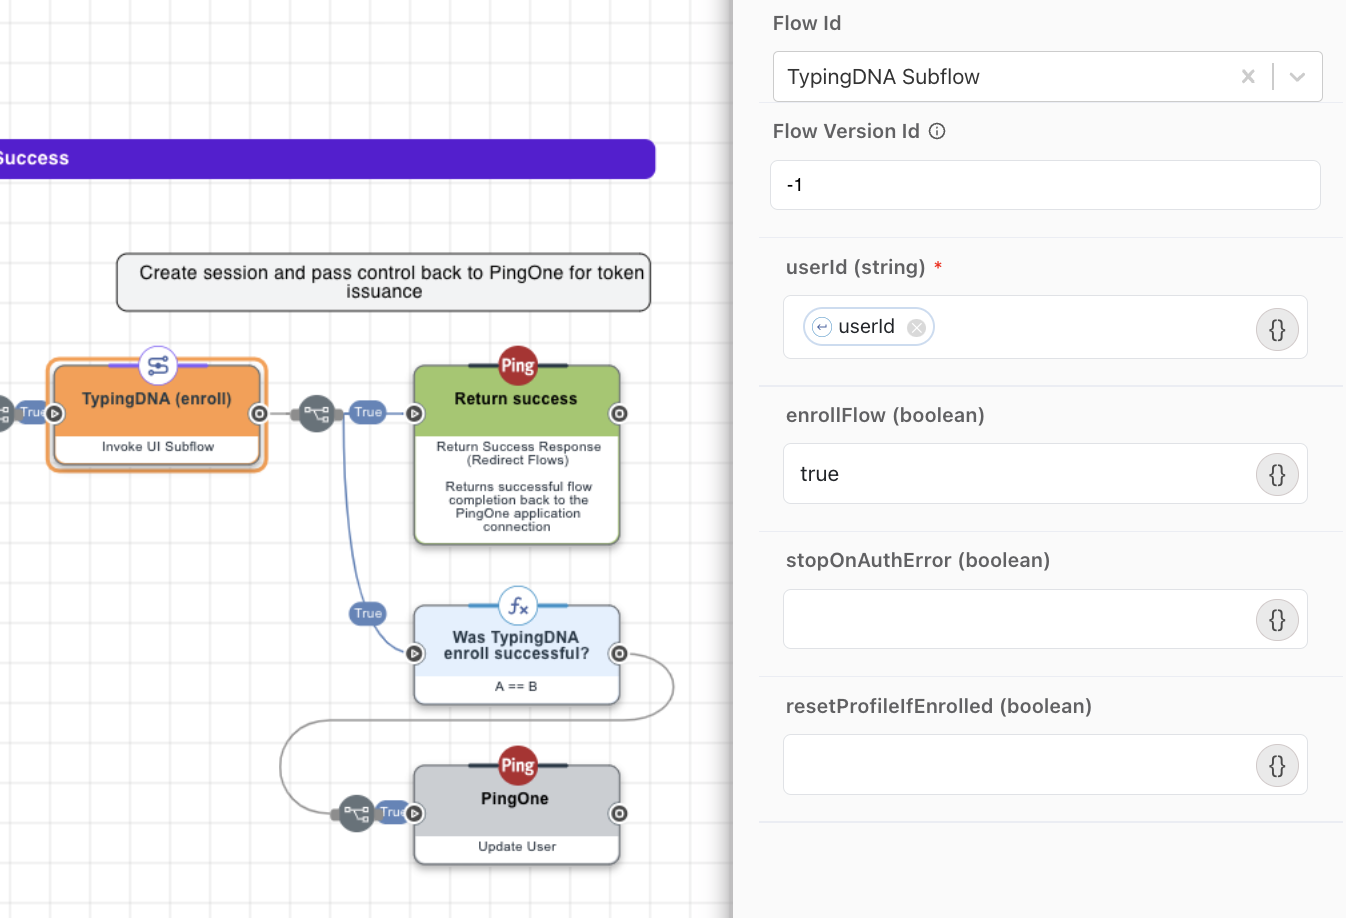
Note that both Authentication and Enrollment connectors below use the same UI Subflow (TypingDNA Subflow imported at step no. 2 and configured at 3,4,5) but with a slightly different configuration for each.
To configure the two flow connectors launching the TypingDNA Subflow, you first need to pass the userId (the id that platform is using to authenticate the user). This is the userId that has to be passed back to the app once the authentication succeeds and the userId under which typing patterns will be enrolled and verified by TypingDNA.
Then, for Authentication, make sure the stopOnAuthError=true (this will make the flow stop if the TypingDNA authentication failed). However in a more complex MFA/risk authentication concept you may want to allow the flow to escape a failed authentication and go through a different factor. To do so leave stopOnAuthError undefined.
For Enrollment, set enrollFlow=true and leave everything else undefined. This way if the user is already enrolled, the subflow will be bypassed, and this section is only useful for user onboarding. You can add the enrollment subflow anywhere after login success happens, and can be added in multiple flows, as this typically happens only once per user.
The reset profile capability is not demonstrated here because this is a basic flow which does not support it. We recommend the reset profile to be handled by an administrator through a different mechanism (explained below).
Finally, after setting up all the above, please make sure that the flow(s) in which you added the TypingDNA Subflows is active for your app(s).
7. (Optional) Import the TypingDNA reset profile flow (for admins)
This flow can be run completely independently by an admin in order to check a user and reset its TypingDNA profile.
Download this .json flow and import it in your DaVinci flows, like the subflow at step no.
2.
To configure the purple connector use the exact same method and info from step no. 4 and 5 above.
When you will be using the flow in production, please make sure to supply the correct userId for the user to
check/reset (explained below).
How does it work for a user?
Users must enroll with TypingDNA, either automatically via a flow like the one above (after login requirements were initially satisfied), or manually, if you design a particular flow that invites them to set TypingDNA up during, after or independently of a user login.
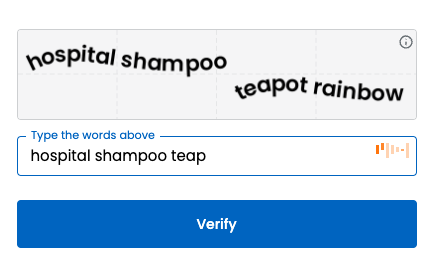
During enrollment, users type a random 4-word combination to create a unique typing pattern to be used in future authentications. An algorithm ensures these words cover the keyboard well enough.
At authentication, the user is simply prompted to type just one time for authentication.
If they fail to authenticate we try a second time (dual pass) and if the user fails again, they usually have to restart login, or if the flow design allows them to go through another method for authentication. If multiple fails happen, we eventually stop the user from being able to try authentication with TypingDNA until an administrator evaluates it and resets the user profile.
How to reset TypingDNA for a user?
Method 1
A user with PingOne DaVinci admin privilege can reset the TypingDNA profile of any user at any time using the flow imported at step no. 7 above.
Go to the desired Env, click on the DaVinci menu, find the flow, and click Try flow. Then, supply the userId that you want to check and/or reset.
Method 2
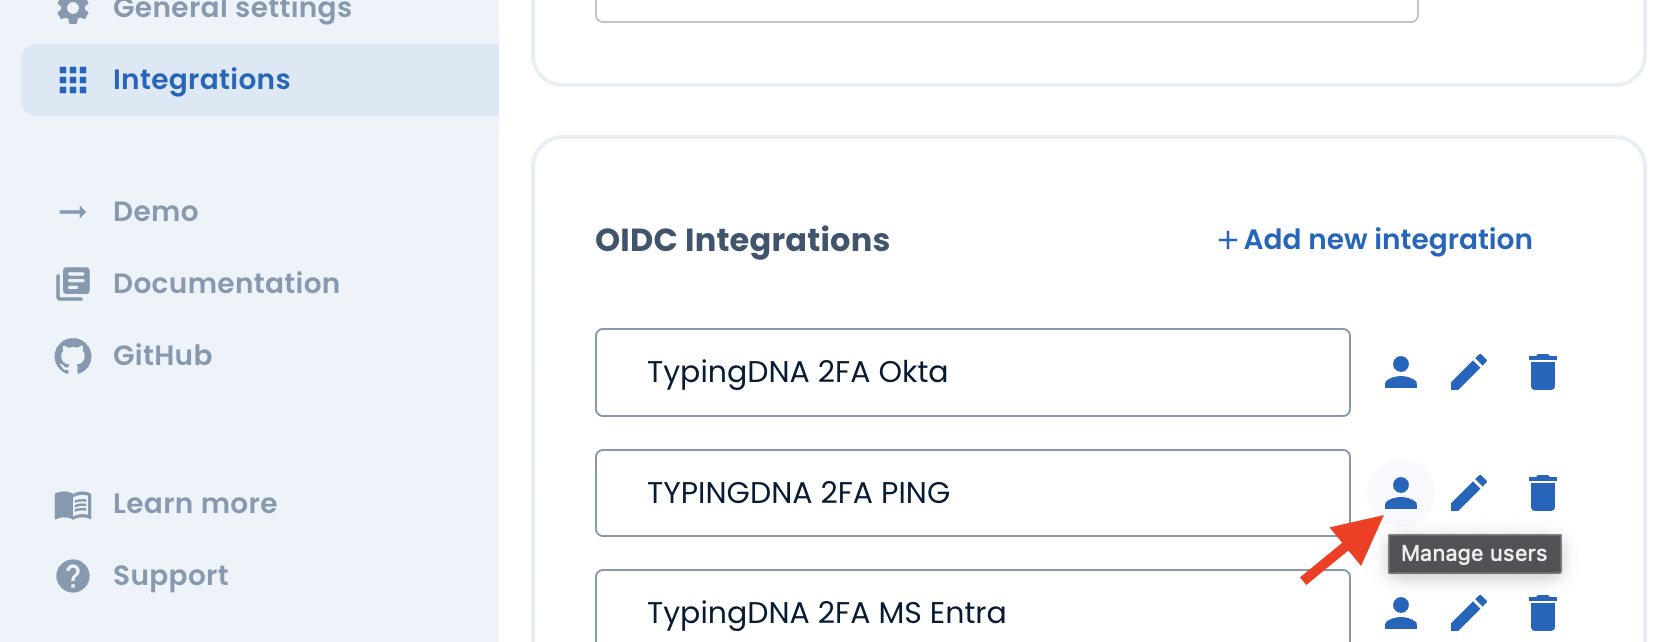
A user with TypingDNA client admin privilege can also reset the TypingDNA profile of any user from the TypingDNA OIDC integration administration.
Go to your TypingDNA dev/client account, in the Verify 2FA tab and find the OIDC integration that you are using in Ping. Click the user icon.
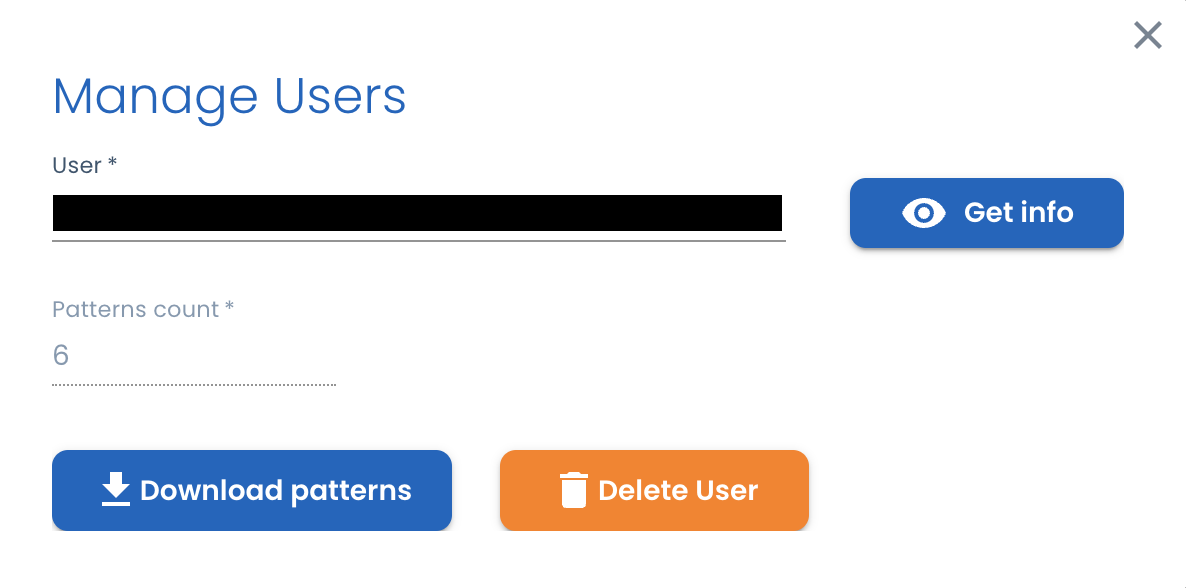
Enter the userId that is used in Ping, and click Get info. Once the information is retrieved, click Delete User.
Now the user can safely Set up TypingDNA again if they choose to as they should appear to not be enrolled with TypingDNA anymore.
TypingDNA Subflow in more detail
In case you want to break down the TypingDNA Subflow and build your own flow. Here are some details about what it does.
Normally the flow starts in the top left corner, computes some information, about device and user, and then it either does authentication, or enrollment exiting in one of the success connectors.
1. Checking device. The 2 gray connectors on the top left are verifying if the device is desktop or mobile, in 2 different ways. After the verification another light blue connector computes the “isDesktop” boolean param. This is important because TypingDNA Verify 2FA should not be run on a mobile device. If the device is mobile/non-desktop, later in the flow, the request will be directed towards the yellow success connectors (Back w/o successful auth/enroll).
2. Checking users. The purple connector on the left is responsible for identifying if the user is already enrolled with TypingDNA. If it's an authentication subflow and the user is not enrolled, this will ultimately exit through the yellow success connector (Back w/o successful authentication). Otherwise a normal authentication flow will occur.
If however it's an enrollment flow and if the user is not yet enrolled the enroll flow will continue as desired. Otherwise, it will not enroll and will exit through the yellow success connector.
3. Green success connectors. The green success connectors are desired exits. If all goes well the authentication and the enrollment flows will exit through the green connectors.
4. Error messages. If authentication fails, an error message is displayed, and if the sublow is set to stop for error messages, the flow will not continue any further after hitting the second error message.
5. Reset profile. We don't recommend resetting a profile using this section, however we incorporated it for demonstration purposes and the potential use where the user is able to verify themselves with something else prior to resetting their profile and enrolling again.